May 2023
Google Play Store remains the dominant platform for reaching Android users worldwide. With over 2.5 billion active devices and millions of apps available, getting your submission right the first time is critical to reaching your audience quickly.
This guide walks you through the complete 2026 Google Play submission process with updated requirements, including the mandatory Data Safety section and current bundle upload procedures. Whether you're submitting your first app or your fiftieth, this step-by-step checklist ensures you won't miss any critical requirements.
✅ Quick reference needed? View our visual checklist below, or read our step-by-step article to navigate through specific steps.
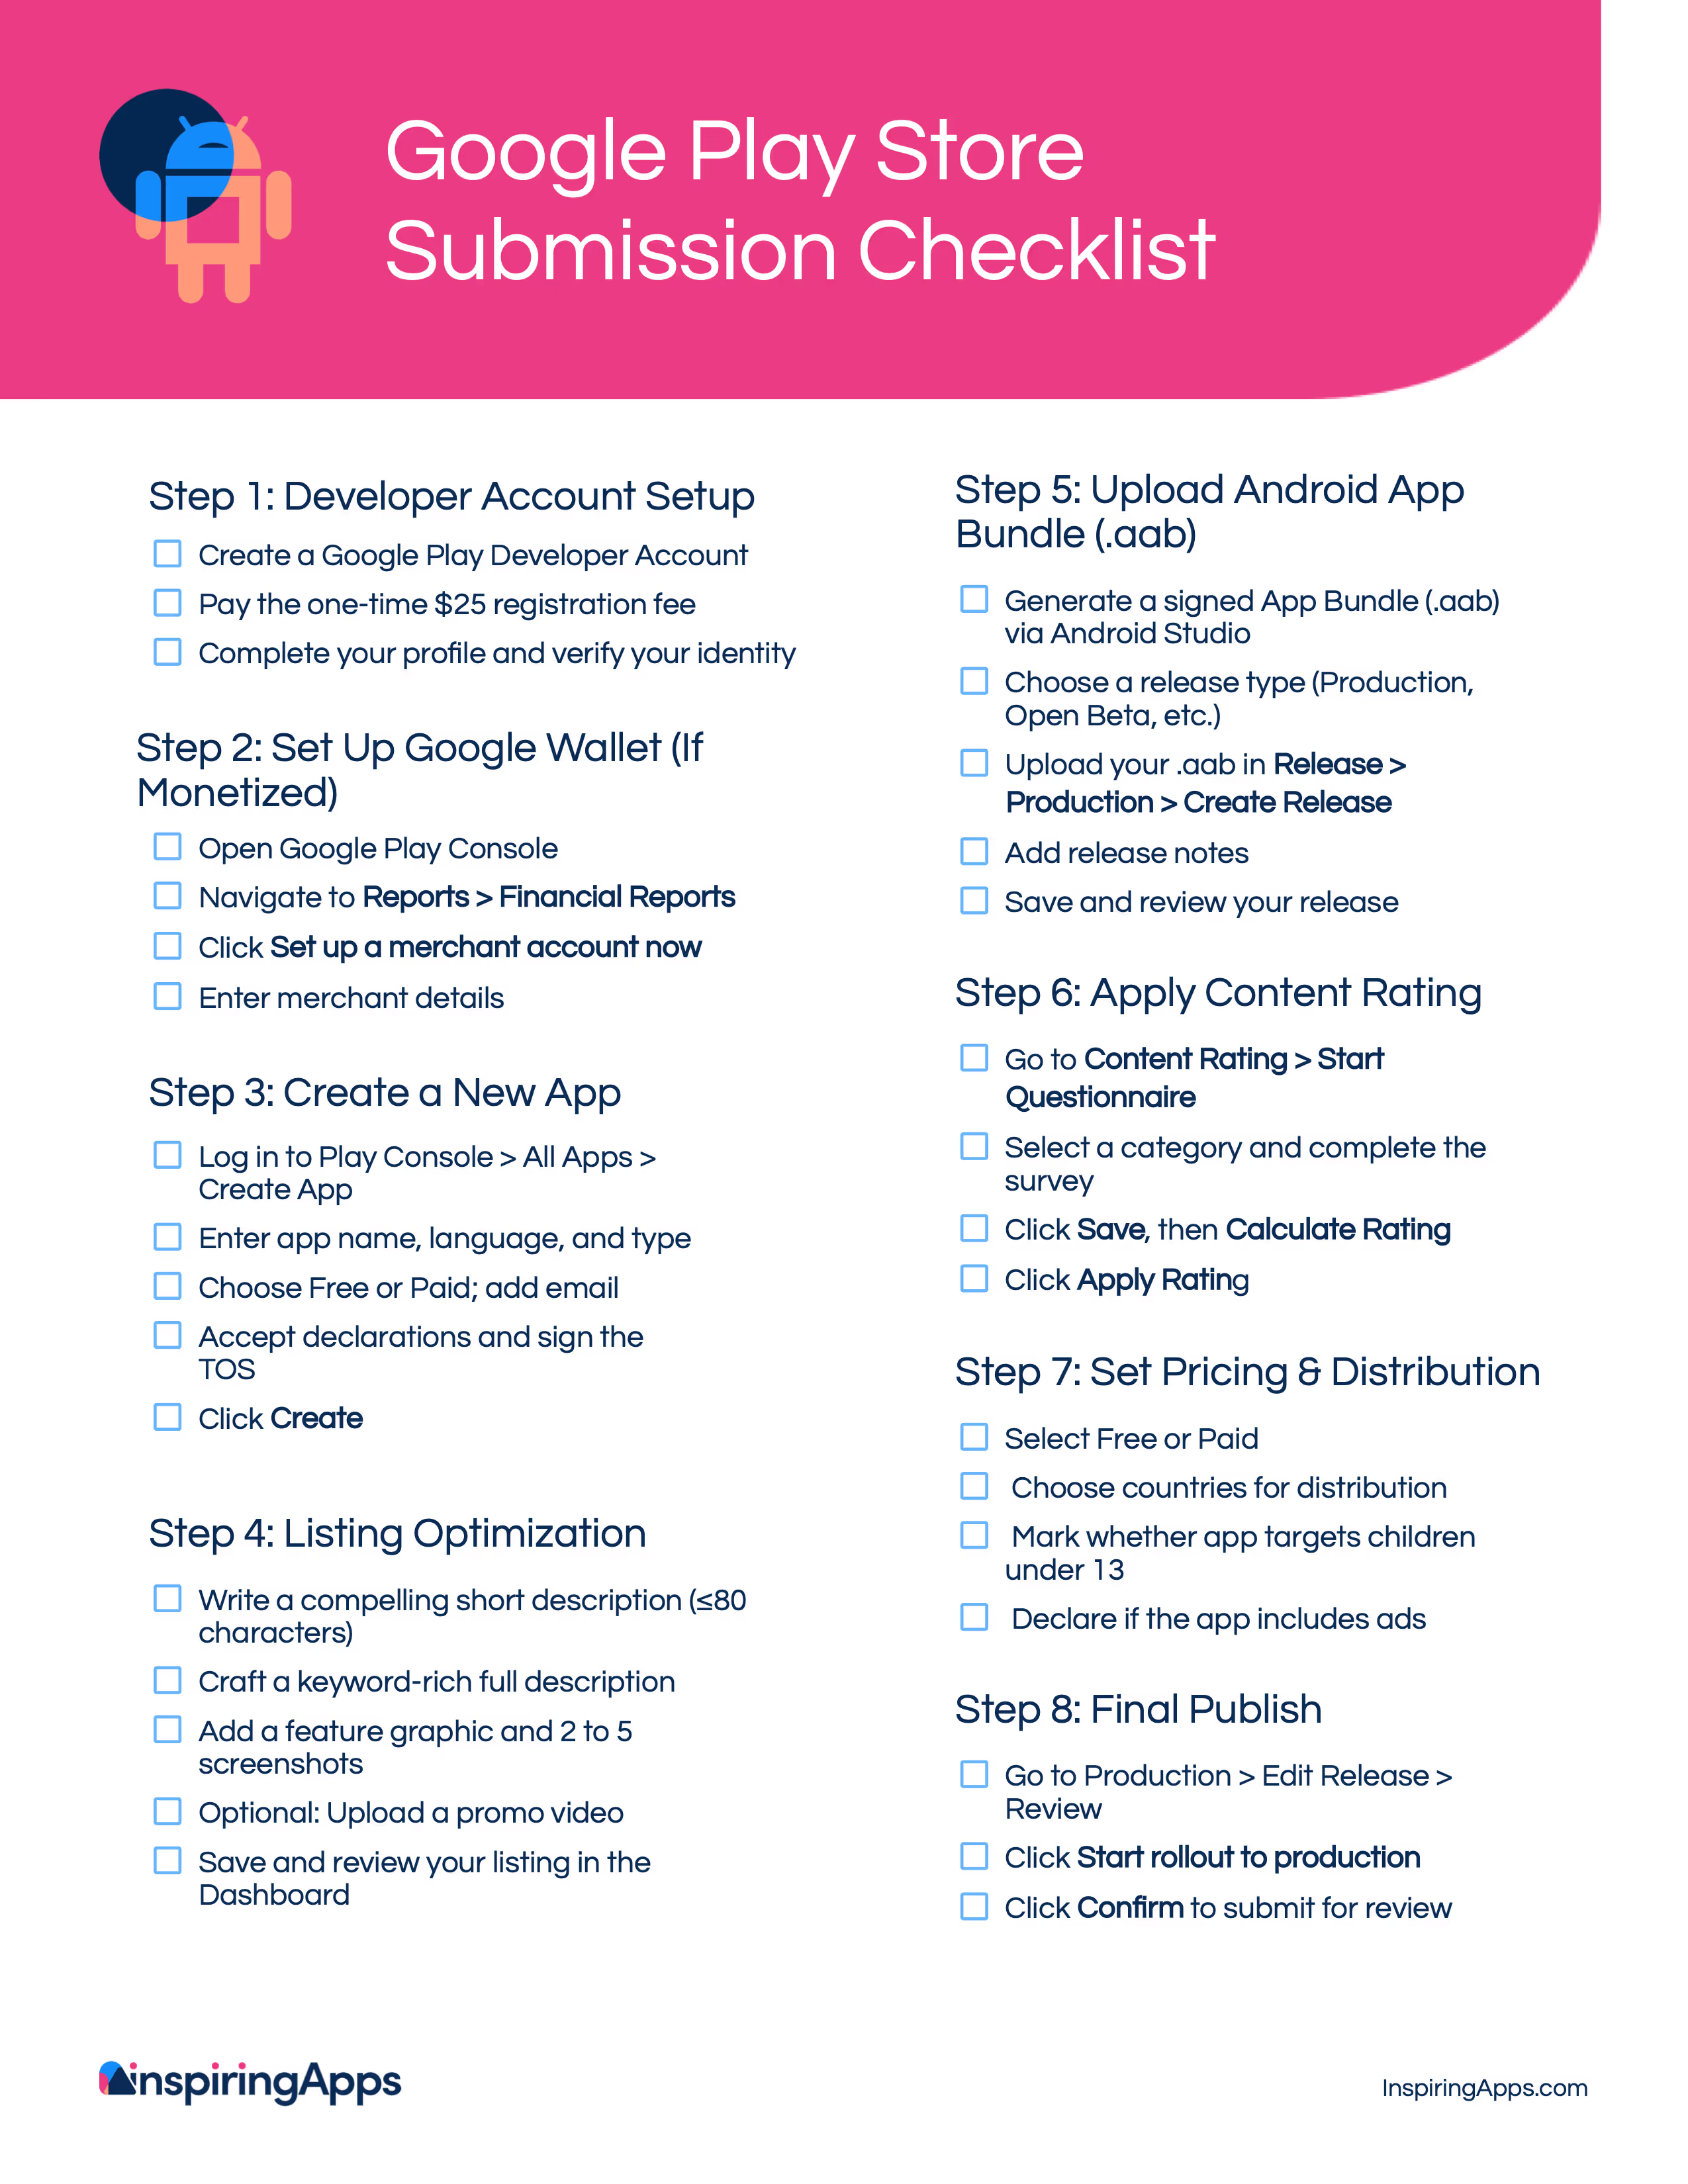
Your developer account is crucial for uploading your Android application to the Google Play Store. Google Play Console is a central dashboard for your developer account where you can submit Google Play Store apps.
When opening your account, you’ll pay a one-time $25.00 app store app publish price. After that, you can submit apps for free. If you’re wondering about Play Store app fees, Google only charges the initial developer registration. There are no recurring costs to list your app, though in-app purchases are subject to standard transaction fees.
Complete all the credentials, including your name, country, and other information. After submitting these details, you’ll need to wait up to 48 hours for Google to approve your application.
A merchant account automatically links to your Google Play Console developer account. The merchant account enables you to manage your app’s sales. But, you only need to complete this step if your app supports in-app purchases—otherwise, skip to step 3.
Sign in to your developer account on Google Play Console to create a merchant account. Select Reports, and next, Financial Reports. Then, click Set up a merchant account now. Finally, add your details to your Google account.
A quick note before you start here: Google doesn’t allow you to convert a free mobile app into a paid one, so if your new application is free, know this decision is permanent. However, you can change the app’s price if you so desire.
To create your app, log in to your Google Play developer console. Then, go to All applications in the menu, and select Create Application. You'll need to provide the following information:
Basic app information:
Additional requirements:
Declarations: You'll need to complete the Declarations section, acknowledging that you meet Google's Developer Program Policies and comply with US export laws. You'll also accept the Play App Signing Terms of Service.
Finally, click Create.
Once you’ve created your app, you can begin setting up the details for your Google Play Store listing. It’s hard to capture the attention of a potential customer without a great app store listing, so you’ll want to spend ample time performing app store optimization. Here’s where to focus:
Core listing elements:
Visuals
Data Safety Declaration (Mandatory) This critical section requires detailed disclosure and often takes 30-60 minutes to complete thoroughly:
⚠ Critical: Your Data Safety declarations must be consistent with your privacy policy. Inaccurate or incomplete disclosures can result in immediate rejection or app suspension. Take time to work with your development team to ensure accuracy.
When ready, select Dashboard from the left-hand menu in Play Console. Follow the step-by-step guides to complete each section. Incomplete sections will be clearly marked, and you cannot proceed to publication until all required fields are completed.
Google Play requires new apps to publish with the Android App Bundle (.aab format). Google Play uses these bundles to deliver device-optimized APKs that make apps more efficient and smaller for end users.
What you need before uploading:
You can use Android Studio to prepare your app release. For additional details on release preparation, see the Android Developers site.
Upload process:
Understanding release tracks:
For your first submission, we recommend using internal or closed testing first (see Step 6) before moving to production.
Before submitting directly to production, we strongly recommend testing your app with real users first. Google Play's testing tracks let you validate functionality, gather feedback, and catch issues that could delay your production review.
Why test before production?
Testing track options:
Internal Testing
Closed Testing
Open Testing
Testing workflow:
Pro tip: Even if you're confident in your app, use internal testing to catch any last-minute issues. The few extra hours spent can save days if your production submission gets rejected.
Ready to skip testing and go straight to production? Jump to Step 7 →
Google doesn't allow apps without a content rating on its store. Content ratings inform users about potentially objectionable content and enable parental controls where required by law.
How content rating works:
The rating questionnaire asks about your app's content and assigns appropriate ratings through the International Age Rating Coalition (IARC). Ratings are typically issued within minutes of completing the questionnaire—this is one of the fastest steps in the submission process.
⚠ Critical: Misrepresentation in your content rating can result in app removal or account suspension. Answer accurately and thoroughly.
When to update your rating:
You must update your content rating if your app's content changes, including:
How to complete the questionnaire:
Common rating categories:
Best practice: If you're unsure about a question, err on the side of disclosure to avoid violations. You can always contact Google Play support for clarification before submitting.
Your pricing and distribution settings control where your app appears and how users can access it. Remember: You cannot convert a free app to a paid app later—this decision is permanent.
How to configure pricing and distribution:
Navigate to Policy → Pricing & distribution in the Play Console left menu.
Pricing
Choose whether your app is FREE or PAID:
If selecting paid, you'll set your base price in USD, and Google Play automatically calculates equivalent prices for other currencies. You can adjust individual country pricing if needed.
Geographic distribution
Select where your app will be available:
Strategic approach: Consider starting with a limited release (1-3 countries) to validate your app, gather feedback, and refine your listing before expanding globally. You can add countries at any time.
Device categories
Specify which device types your app supports:
Only select categories where you've optimized your app's experience. Poor tablet experiences, for example, can lead to negative reviews.
Target audience and content
Designed for children (under 13)?
Contains ads?
Be truthful—failing to disclose ads can result in app suspension.
Content policy compliance
Confirm your app complies with:
Additional distribution options:
Primarily child-directed: Flag if your app targets children as its primary audience
You're almost there! This final step submits your app to Google's review team.
Pre-publication checklist:
Before clicking publish, verify you've completed:
How to publish:
What happens next?
Your app enters Google's review queue. Here's what to expect:
Review timeline:
Review process includes:
During the review:
Possible outcomes:
Approved
Rejected
Additional information requested
After approval:
Congratulations! Your app is now live on Google Play and available to billions of Android users worldwide.
How much does it cost to publish or put an app on Google Play? You’ll pay a one-time $25 fee to create your Google Play developer account. After that, you can upload unlimited apps without any additional listing costs. Google doesn't charge recurring app store fees. However, if your app includes paid features, in-app purchases, or subscriptions, Google takes a 15% commission on the first $1M in annual revenue (30% thereafter).
Can I upload an APK to Google Play? No, not for new apps. As of August 2021, Google Play requires Android App Bundles (.aab) for all new app submissions. Existing apps that previously used APKs can continue to update with APKs, but we recommend migrating to App Bundles for better optimization and smaller download sizes.
How long does the review process take?
Timeline varies based on app complexity, policy compliance, and current review queue volume.
Can I update my app after it’s published on Google Play? Yes, absolutely. You can release updates anytime through the Google Play Console. Each update goes through review before going live, but review time is typically shorter than first-time submissions (1-3 days vs. 3-7 days). Best practice: Increment your version number and provide clear release notes describing changes.
Do I need a privacy policy? Yes, if your app accesses sensitive user or device data (location, contacts, photos, etc.). Your privacy policy must be hosted on a secure, accessible URL and accurately reflect your data practices. It must also be consistent with your Data Safety declarations.
What's the Data Safety section? The Data Safety section (mandatory since July 2022) requires you to disclose what user data your app collects, shares, and how it's secured. Accuracy is critical—inconsistencies with your actual app behavior can result in suspension.
Ran into issues during the upload process? Common causes include mismatched bundle IDs, missing content ratings, or unaccepted declarations. The Play Console often provides detailed error messages—read them carefully. They usually include:
If you've addressed the issues and still face rejection, consider:
Congratulations on working through the Google Play submission process! While the steps may seem involved, each requirement exists to ensure app quality and user trust on the platform.
Key takeaways:
Working with an app development partner like InspiringApps makes the process seamless. We handle the technical complexity while ensuring policy compliance, allowing you to focus on your app's success. We're ready to help as a dedicated resource when you need it.
What's next after approval?
Check out these additional free InspiringApps resources:
Get the green light on your first attempt to submit your app. Explore our comprehensive playbook on marketplace submission and acceptance of your iOS and Android apps—with additional tips on monitoring marketplace performance and ensuring your app’s ongoing success.
Download the guideWe help brands thrive in the digital world.
Inspired Where We Are—Our team of experts is 100% US-based, delivering user-inspired digital products from Boulder and beyond.